Thanks for reading today's post!
Showing posts with label Made With My Cricut. Show all posts
Friday, May 17, 2013
All-Star Baseball 2 Page Scrapbook Layout Made With Cricut Sports Mania
Here's a layout from Landon's scrapbook. Since I find baseball clothing on little babies just adorable I had Landon wear a baseball outfit for his 3 month pictures, and I found some stars and stripes baseball scrapbook paper that coordinated perfectly.
I used the Sports Mania cricut cartridge to cut out the "All Star" and "Play Ball" and the Plantin School cartrige for "our little" and "3 months". And I cut the baseball and star embellishments out of scrapbook paper. This was a very fast layout and only took less then 20 minutes to throw together.
Thanks for reading today's post!
Thursday, April 25, 2013
DIY Baby Age Blocks for Photo Props
I can not take complete credit for this project. My mom passed the idea on to me after seeing a present that my sister-in-law received as a shower gift (purchased from BB Blocks). And I have to thank my dad for doing the cutting, sanding, beveling, and staining. Complete instructions are located at the end of this blog post.
My Age Blocks Put to Use on Baby Austin:
Instructions for making your own photo blocks:
Supplies:
Instructions:
- 4x4 piece of wood that is at least 15 in. long
- polyeurothane & sanding blocks
- For the lettering
- Cricut cutter and cutting mat
- multiple colors of adhesive-backed vinyl
- font cartridge (I used Cake Basics).
- transfer tape
Instructions:
- Step 1: Starting with a wooden 4x4, cut the wood into two cubes (actual dimensions are ~3.5 in. x 3.5 in. x 3.5 in). Then cut a rectangular piece that is 7" long (7 in x 3.5 in. x3.5 in). Use a beveler or a sander to round the edges, and thoroughly sand all surfaces.
- Step 2: Apply two or three coats of polyurothane, sanding between each coat. For best results, follow the application and sanding instructions on the polyurethane label.
- Step 3: While the polyurethane is drying, cut the letters and numbers out of the vinyl as described below.
- for the first cube: cut numbers 1, 2, 3, 4, 5, and 6
- for the second cube: cut numbers 0, 1, 2, 7, 8, and 9
- for the rectangular cube: cut the following words: days, weeks, months, and years
- Step 4: Using the transfer tape, apply the words and numbers to the blocks.
- Step 5: Once the vinyl letters and numbers are in place, add two or three more coats of polyurethane, sanding lightly between coats. This will protect the vinyl from getting scratched and scuffed.
Friday, February 22, 2013
Heart Shaped Wedding Vow Scrapbook Layout
Now that we are approaching our five year wedding anniversary, I am finally starting to make progress on my wedding scrapbook. I am now up to the vows and exchange of rings. And here is the 2-page layout I created. I scrap-lifted this idea from Scrapbooks Etc. magazine.
The version from the magazine was only a 1 page layout for the wedding vows, but I quickly transposed it into a two page layout by mirroring the images and using the second page for the exchange of rings.
All the paper came from Hobby Lobby and is either Paper Studio or My Mind's Eye. I used one of the cricut wedding cartridges to cut the templates for the hearts, and the Plantinum Schoolbook cartridge for the blue lettering.
I hand-wrote our traditional wedding vows on strips in the bottom corner to make sure we always remembered exactly what we promised.
And I did the same with the priest's words during the exchange of rings.
So I hope you liked today's project. I am making myself a promise to set time aside each week to do scrapbooking so I can start to get caught up. So keep checking back for more scrapbook layouts. And until next time, have a Sew Scrappy Day!
Friday, January 25, 2013
Personalized Wooden Heart Wall Hanging (Just Like Candy Hearts!)
I am starting to get in the Valentine's Day spirit and found a little time this week to make a wall hanging like one I found on Pinterest (here is the link to the original project). And here is my version of the project, personalized for my family:
The entire project was under $10. I hit a good sale at Hobby Lobby and bought the 7" wooden hearts for $1 a piece (50% off!), and I found the perfect red and white heart ribbon (the picture below shows a close up of the ribbon, as you can see in the close up below). I painted each heart a different pastel color to emulate the look of candy hearts. Then I added the names of each person in our family in red vinyl. You could use scrapbook stickers to do this, but I used my Cricut and the Cricit Alphabet font cartridge to cut the letters out of vinyl so each name would fit perfectly onto the 5" wide heart. Finally, I used hot glue to attach the ribbon to the wood hearts, and tied a bow on top.
I didn't want to give away the name we have picked out for the little baby boy we are expecting (which is due in only 2 months nows!) so I used the word baby as a place holder. I did cut out the letters for the baby's real name and and tucked them away for next year. The good thing about this vinyl is that it effortlessly peals off without marring the paint, so I can update that name easily when I get the decoration out for next year.
And here is a close up of the adorable heart patterned ribbon:
Well that is all for now! Thanks for reading my post, and until next time be sure to have a Sew Scrappy Day!
The entire project was under $10. I hit a good sale at Hobby Lobby and bought the 7" wooden hearts for $1 a piece (50% off!), and I found the perfect red and white heart ribbon (the picture below shows a close up of the ribbon, as you can see in the close up below). I painted each heart a different pastel color to emulate the look of candy hearts. Then I added the names of each person in our family in red vinyl. You could use scrapbook stickers to do this, but I used my Cricut and the Cricit Alphabet font cartridge to cut the letters out of vinyl so each name would fit perfectly onto the 5" wide heart. Finally, I used hot glue to attach the ribbon to the wood hearts, and tied a bow on top.
I didn't want to give away the name we have picked out for the little baby boy we are expecting (which is due in only 2 months nows!) so I used the word baby as a place holder. I did cut out the letters for the baby's real name and and tucked them away for next year. The good thing about this vinyl is that it effortlessly peals off without marring the paint, so I can update that name easily when I get the decoration out for next year.
And here is a close up of the adorable heart patterned ribbon:
Well that is all for now! Thanks for reading my post, and until next time be sure to have a Sew Scrappy Day!
Wednesday, January 2, 2013
Mickey Mouse & Pluto Wall Plaque
I have just been dying to post this project, but since it was a Christmas present for my mom I had to wait until after the gifts were unwrapped. She has a Mickey themed bedroom and has been looking for some cute wall decorations to finish off the room. And of course, I saw this as an opportunity to use my Cricut and do some crafting.
I started with a 14" x 14" wood plaque, which I painted blue and then trimmed in black. Then, using the Mickey and Friends Cricut Cartridge, I cut out the all the layers. And slowly, layer by layer, used Mod Podge to adhere each layer onto the plaque. (Just a word of advice -- when you are deco-podging paper on paper, making sure you allow plenty of dry time between each layer and coat of Mod Podge, and be sure to use a rubber roller to get all the air bubbles out of the paper.) I finished with a few extra coats of Mod Podge and then an acrylic sealer.
Now I can't wait for my next trip home so I can see the plaque in the Mickey themed room!
Monday, December 17, 2012
Jingle All The Way Shadow Box
Here is a really easy hand made Christmas present that takes only a few minutes to put together and can easily done for under $10 -- a jingle bells shadow box.
Here are the supplies I used:
- 5" x 7" shadow box -- I bought these at Michaels on sale for $4.99. If they are not on sale, you can always use the 40% off coupon.
- 1 package of jingle bells. I got mine for under $2 at Joanne's.
- Vinyl stickers that say "Jingle All the Way"
- Scrapbook paper or wrapping paper for the background in the shadow box
- Ribbon for the outside of the shadow box.
On the shadow boxes that I made for last year's teacher gifts, I just used fancy scrapbook lettering to spell out the words "Jingle all the way", but for this year's teacher gifts I decided to be a little more creative and used my Cricut cutter, so I played around in the Cricut Craft Room design software to see what I could come up with. Here's the cartridges that I used:
- Cutting Up cartirdge for the words "jingle" and "way".
- Plantin School book cartridge for the words "all the"
- Christmas Joy cartridge for the bell
- Christmas Cheer cartridge for the bow.
Here's a peak at what I came up with in Cricut Craft Room. If you would like to download the actual Cricut Craft Room file, click here.
Thursday, December 6, 2012
Paint-Your-Own-Pottery Christmas Tray
Today I am sharing with you my favorite paint-your-own-pottery project that I have ever done. I got this idea from my friend Thuong. We made this at Fired Up, a paint-your-own-pottery studio back in Peoria, Illinois.
We used the Speaking of Winter cricut cartridge to make stencils spelling out my last name (Michels). Notice how this cartride uses traditional winter themes such as snowmen, mittens, and scarves to form the lettering.
This project was really a labor of love. Each color required at least 3 coats of paint, but the yellow and white paint required 5 coats of paint to make sure the colors underneath did not show through. I think I spent over 30 hours on this project, but it was worth it in the end.
And if you've never seen the Speaking of Fall Cricut cartridge, here are the shapes that it comes with. It's really a neat cartridge.
Well that is all for today. I hope you are enjoying the holiday season. Until next time, have a Sew Scrappy Day.
We used the Speaking of Winter cricut cartridge to make stencils spelling out my last name (Michels). Notice how this cartride uses traditional winter themes such as snowmen, mittens, and scarves to form the lettering.
This project was really a labor of love. Each color required at least 3 coats of paint, but the yellow and white paint required 5 coats of paint to make sure the colors underneath did not show through. I think I spent over 30 hours on this project, but it was worth it in the end.
And if you've never seen the Speaking of Fall Cricut cartridge, here are the shapes that it comes with. It's really a neat cartridge.
Well that is all for today. I hope you are enjoying the holiday season. Until next time, have a Sew Scrappy Day.
Tuesday, December 4, 2012
Easy But Elegant Glass Bulb Ornaments Made with Cricut
Here are some easy and inexpensive home made Christmas ornaments made using glass bulbs, ribbon/cording, and vinyl stickers. These make great tags on the outside of Christmas presents or great gifts when packaged in sets. I even made a bunch for teacher gifts.
I bought the glass bulbs from Hobby Lobby on sale for under $5 for a 6 pack. I bought the vinyl on line and cut it with my Cricut using the Stone Script cartridge for the lettering and Joys of the Season for the snowflake. If you don't have a Cricut you could easily do this with scrapbook stickers too.
For my family, I used white vinyl with blue bulbs. I thought the silver cording added an elegant touch.
I made some red bulbs with gold stickers and cording for my parents labeles "Gramma" and "Grampa" but I didn't get a good picture.
Here's part of the set I made for my brother and sister-in-law. For them I used red vinyl and red ribbon on white bulbs. These were my favorites.
And here is something I tried using clear bulbs that I filled with metal beads.
I hope you enjoyed today's posts, and until next time have a Sew Scrappy Day!
I bought the glass bulbs from Hobby Lobby on sale for under $5 for a 6 pack. I bought the vinyl on line and cut it with my Cricut using the Stone Script cartridge for the lettering and Joys of the Season for the snowflake. If you don't have a Cricut you could easily do this with scrapbook stickers too.
For my family, I used white vinyl with blue bulbs. I thought the silver cording added an elegant touch.
I made some red bulbs with gold stickers and cording for my parents labeles "Gramma" and "Grampa" but I didn't get a good picture.
Here's part of the set I made for my brother and sister-in-law. For them I used red vinyl and red ribbon on white bulbs. These were my favorites.
And here is something I tried using clear bulbs that I filled with metal beads.
I hope you enjoyed today's posts, and until next time have a Sew Scrappy Day!
Saturday, October 13, 2012
Simple Halloween Scrapbook Layout - Landon's First Halloween
As we get closer to trick-or-treating I have been reminiscing about Landon's first Halloween. He was so little and and didn't quite get the concept of Halloween, but he loved the pumpkins and he loved the giant chunk of cheese that went with the mouse costume I made for him. The mouse costume was my first sewing project and was full of frustrations, seam ripping, and re-sewing -- which makes me appreciate the completed costume all the more. And Landon won 2nd place at the Germantown Hills costume contest :)
The letters were made using the Cuttin Up Cricut cartridge. All the patterned paper is from the All Seasons paper pad from The Paper Studio. And the 3-D pumpkin stickers are something I found in the seasonal section at Hobby Lobby.
Here's some close ups of the cutest little mouse ever:
That's all for now folks. I've got more great fall and Halloween projects coming up, so keep checking back. Until then, have a Sew Scrappy Day!
Labels:
Fall,
Halloween,
Made With My Cricut,
Scrapbook Layouts
Tuesday, August 7, 2012
From Cookie Sheet to ABC & 123 Magnet Board
A while back I bought Landon a set of magnetic letters. At our old house our dishwasher was magnetic, so he had a place to use them. But in our new house, everything is stainless steel, and although it looks really nice, it is not magnetic. But thanks to Pinterest, I got the idea to make a magnetic board from a cookie sheet. And here is my version:
I started with a magnetic cookie sheet. This is very important, otherwise you have to use magnetic spray paint, which I haven't had much luck with. I actually took the magnetic letters to the store with me to make sure they would stick.
The first thing I did was punch 4 holes along the top and inserted eyelets using my Big Bite hole punch and eyelet setter. Then I applied a coat of spray paint primer followed by 2 coats of the navy blue spray paint.
Next, I added the ribbon for hanging and decorated it with the vinyl stickers. I used my Cricut and the Plantin Schoolbook cartridge to cut the "A B C" and "1 2 3".
I haven't figured out where I am going to hang this, so far now Landon just gets to play with it on the floor, but he is enjoying it so far!
Thanks for reading my blog! And until next time, have a Sew Scrappy Day!
The first thing I did was punch 4 holes along the top and inserted eyelets using my Big Bite hole punch and eyelet setter. Then I applied a coat of spray paint primer followed by 2 coats of the navy blue spray paint.
Next, I added the ribbon for hanging and decorated it with the vinyl stickers. I used my Cricut and the Plantin Schoolbook cartridge to cut the "A B C" and "1 2 3".
I haven't figured out where I am going to hang this, so far now Landon just gets to play with it on the floor, but he is enjoying it so far!
Thanks for reading my blog! And until next time, have a Sew Scrappy Day!
Tuesday, July 31, 2012
"Create a Critter" Play Time Layout
Today's project is a scrapbook layout I made for Landon's excersauser days. I used my Cricut to make both the text and the animals -- the "Create a Critter" and "Tear Drop" font cartridges. All the paper came from Scrapadoodle, my favorite store back in Peoria.
Landon's excersaucer was zoo themed, and he just loved playing with the zebra, monkey, lions, and giraffes. I sure miss those days when he would spend endless hours just sitting and discovering the toys on his excersaucer! And boy was it easier back then when he couldn't run all over the place....
Well that is all for today folks!
Sunday, July 22, 2012
Look Who Turned 2 -- Landon's Mickey Mouse Birthday Party
At the time of the party, Landon's favorite TV show was Mickey Mouse Clubhouse, (actually that was pretty much the only thing Landon would watch) and since there were endless craft possibilities, I decided Mickey Mouse would be the theme -- and I challenged myself to do it without buying Mickey Mouse party supplies. I spent a lot of time on Pinterest and google searches getting ideas, and even more time with my Cricut, to put on this party -- but I really just had a ball putting the party together. Here is what I ended up coming up with:
Invitations: I made the invitations using the Disney Mickey & Friends and the Disney Mickey Font Cricut cartridges and printed out out the inside of the card on my computer.
| Front of invitation |
| Inside of invitation |
The Cake: I had just gotten my Cricut Cake and was so excited to use it. I used cookie cutters ofr the stars and Mickey heads, the cricut to cut out the words. This was my first time using fondant, but I was happy with my first attempt. Erica (my sister-in-law) was a very dedicated assistant for this project. I think our hands were stained blue for weeks from the food coloring used to die the fondant :) One tip I learned for next time -- freezing the cakes before adding the frosting helps keep the edges more square instead of rounded mounds like this ended up.
Happy Birthday Banner: Again, I used the cricut to make the Happy Birthday banner. I used a 12"x24" cutting mat for the Pluto and Mickey characters. I also had the other disney characters scattered about the area.
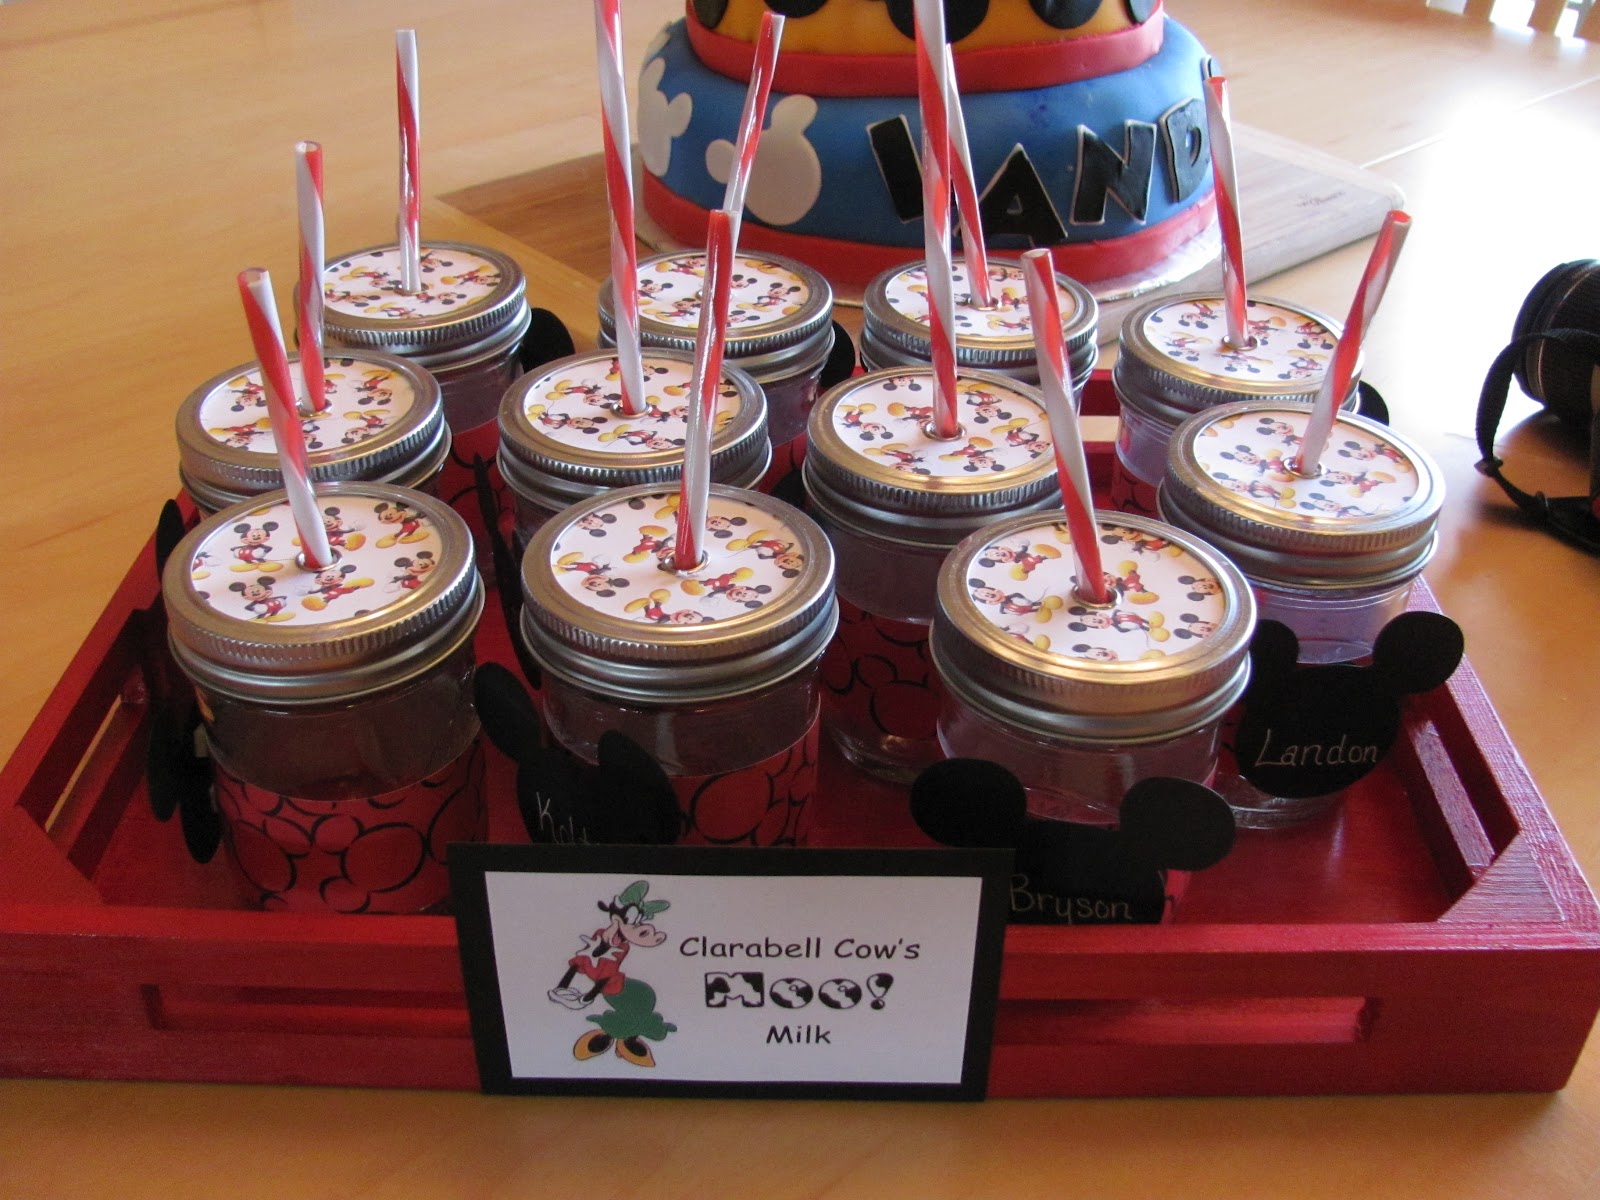
Party Drinks: I wanted to make festive, cheap, and spill proof glasses for the kids to drink from. I came across the idea in a craft magazine to decorate mason jars. So I pulled out my left over jam jars, poked a hole in the lid, and added some Mickey themed paper. To make sure the kids wouldn't get mixed up, I wrote there names in white marker on a Mickey cut outs, and then added some fun plastic straws. To finish it off I painted a wooden tray that some of Landon's toys came in, and then slapped a "Clarabell Cow's Moo Milk" label on the tray. These went over real well with all the kids.
Party Shirt: I saw all these cute shirts on Etsy shops and Pinterest that were just basic white T-Shirts with a Mickey head appliquéd on. I've never done this before, but I decided to give it a try and went easier then I thought it would. And as a bonus -- Landon was super excited to get dressed the morning of his party. He just couldn't wait to wear his Mickey shirt. The shirt got dirty pretty fast, but I guess getting dirty is just party of a 2 year old.
Goodie Bags & Mickey Head Decoration: I saw several versions of tissue paper Mickey heads on Pinterest, and thought this would make a great decoration for the goodie bag table. I started with 1 large styrofoam ball and 2 smaller balls, then used wire to attach tissue paper flowers, and attached a wooden dowel for the stem. For the base I lined a 1 quart mason jar with red tissue paper and then filled with marbles to keep the wooden dowel in place. I added 2 white buttons to the jar to simulate the red iconic shorts that Mickey always wears.
For the party favor bags, I purchase som red bags from Hobby Lobby and then added Mickey Mouse cut outs with each child's name. Inside I had Mickey stickers, a hand made Mickey necklace, Oreo Mickey pops, and hand made baby food jar snow globe. (I really wish I would have remembered to take pictures of the snow globes because they really turned out cool)
Mickey Orea Pops: For a festive extra treat, I made these Orio Pops using regular Oreos, mini Oreos, melted chocolate, and a sucker stick, I made this Mickey Mouse Oreo Pops.
Mickey Mouse Food Table: To keep with the Mickey theme, I used gave all the food Mickey Mouse names. The menu included Mouseker jello, Mickey Mouse-mellow fruit salad, Goofy's gold fish, Pluto's pretzels, Minnie's mushroms, Daisy's delicious dip, Donald's chips & salsa, Pete's potato salad, Oh Toodle's Oreo pops, Clarabelle Cows moo-milk, Hot-Dog-Hot-Dog-Hot-Diggity-Dogs (a.k.a. pigs in a blanket), and Chip & Dale's Veggie Tray.
And a Few Random Pics From the Party:
| We got a quick family shot before the party began. |
| Landon tried feeding his Jello to Mickey |
| Enjoying his chocolate milk from his special glass. |
| We almost lost the cake before the party started :( |
| The nice blanket Gramma made with a kit from Hobby Lobby. |
| Opening presents! |
Well I hoped you enjoyed our Mickey Mouse themed birthday party! Thats all for now, and until next time have a Sew Scrappy Day!
Subscribe to:
Posts (Atom)